In this article I am going to guide on how to create an AdSense account and link it with your website. As a blogger, either Newbie or old skull, surely you must have heard about google AdSense. Also by now you already know that its the best contextual advertisement program on the web. So, how do you create an AdSense account?.
When it comes to making money from your blog, also check mu guide on Affiliate Marketing. This will require basic marketing skills. Lastly don’t miss my personal insight into Affiliate marketing vs AdSense.
For Beginners who are not familiar with Adsense, you will require much help. This is mainly in signing up and optimizing ads for best performance. Adsense is a contextual ad placement program. This means you have to create ads and place them on your website. Google will pay you a certain percentage when someone clicks on your advertisements.
There are a couple requirements you must meet to be eligible for the program. The two most important and essential are:
1. You Must have a website.
2. You must be 18 years of age and above. Otherwise, you will have to use the name of your guardian
How to create an AdSense account: Follow the steps shown below
Google Adsense follows the following steps to approve adsense accounts.
- signs up for adsense.
- Place the page level ad code to your header code
- Wait for google to review and approve or reject your account.
The new account approval process is quite lengthy. Not to mention reviewed their requirements to maintain the quality of adsense. Hence making it quite difficult for new publishers to be accepted in the program.
Its also very important to read, understand and make sure your website comply with adsense policies before applying. Also during sing up, ensure you read their terms and conditions before accepting.
Step-by-Step Guide to Create an AdSense Account
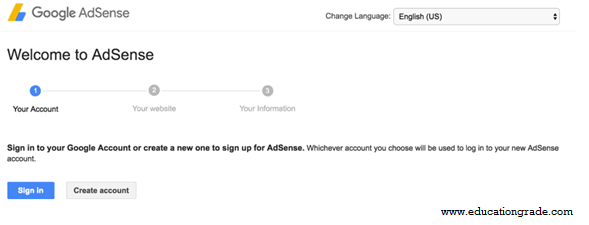
- Go to the Signup page
This will take you to the screenshot shown below. The page gives you an option to sing up with your existing google account or you can choose to create one.

If you have a custom domain name, its highly recommended you use it. This can improve your chance of approval by a great factor. If you do not have a custom domain name, for example admin@yourdomain,com, don’t mind. Just pause for a minute and check my step by step guide on How to use Google apps to create your custom domain name here. Otherwise you can use your gmail address it also works fine.
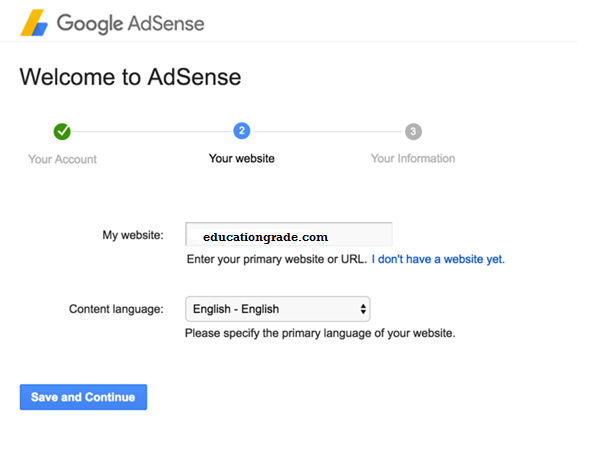
Enter your website detail.

This for is self explanatory. Simply select your preferred language and enter your website address. The website address is your blog URL. For example my blog URL is educationgrade.com. Do not include the ‘http:// part’.
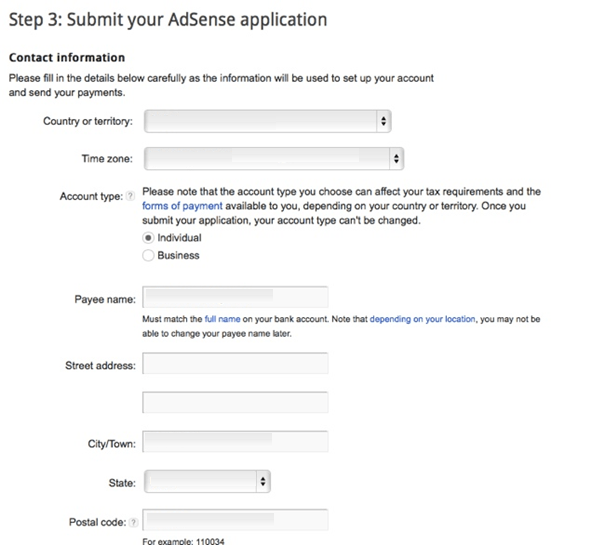
Add your contact information.

Note: this is the most important part of the application process. The information required is also self explanatory. The payee name is very important. It must match your National Identification name, and the name of the account you will be using to receive funds. Adsense normally sends you ETFs or checks under your payee name. In some cases you might not be able to change the payee name.
Second your post address is also very important. Once your account threshold hits $10 adsense will sent you your pin number for account verification.
Accept Adsense policies and submit.

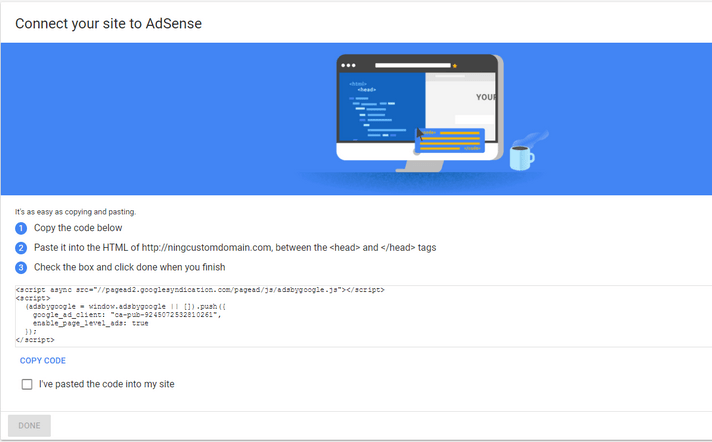
Take at least 5 minutes of your time to go through the adsense policies. Put checkmarks to confirm that you agree to abide by them. Submit your application. After submitting your application, the screenshot shown below will appear. You will have to copy the page level ad to the header.php section of your website. ie between the <head> and /<head>.

copy the code to your website to connect your site to adsense
You will have to copy the page level ad to the header.php section of your website. ie between the <head> and /<head>. after that just sit and wait. It usually take google adsense to 3 days to review your application and give a feedback. some times it can take even more time depending on your geographical location.
I hope this tutorial will guide you successfully on how to create an adsense account. Start earning from your blog now, and if you don’t have one yet don worry, it takes only a few minutes to setup one. Follow my step by step guide on How to create a website. Don’t forget to share your views via the comment section below , and also share the post Facebook, twitter and Google plus
